The term “generic PnP monitor” serves as a cautionary signal from your operating system, indicating potential issues with external monitor detection. This warning often arises when appropriate device drivers are not installed on your system, commonly occurring after a recent Windows 10 upgrade or update. If you encounter the “Failed to load hardware monitor driver” error, it’s likely related to a generic PNP monitor driver problem. It generally comes when you don’t have installed the right device drivers on your system.
Before delving into the solutions for fixing a generic PNP monitor, it’s crucial to understand the implications of generic PNP and the consequences of uninstalling or disabling it on your Windows 10 or 7 PC.

If you have done a recent Windows 10 upgrade or installed the latest update? Well, then you might be facing a generic PNP monitor driver problem while seeing an error “Failed to load hardware monitor driver.”
Windows 10 users frequently face challenges with bugs and errors, and the generic PNP monitor driver issue is no exception. This problem often stems from outdated drivers or insufficient hardware capacity after a system upgrade. Users who have recently upgraded their Windows PC are particularly susceptible to experiencing generic PNP monitor errors.
The probable reason for this error is the outdated driver or insufficient hardware capacity after doing an upgrade. So those users who have recently upgraded Windows PC, are most prone to see generic PNP monitor errors.
If your system didn’t detect another display monitor or you are also facing a generic non-PNP monitor issue, then don’t worry. This article will help you fix this problem.
What is a Generic PNP Monitor driver issue?
PNP stands for “plug and play,” commonly associated with external PC hardware that can be quickly utilized without the need for driver installation. However, when a generic PNP monitor (indicated by a yellow triangle error) appears in the device manager, it signifies that Windows cannot recognize the appropriate device, leading to a generic PNP monitor driver issue in Windows 10.
In this case, Windows installs a generic monitor driver for such hardware. But again this solution doesn’t always work as the driver may not be fully compatible with the hardware. This leads to a generic PNP monitor driver issue in Windows 10.
What Happens if I Disable or Uninstall PNP Monitor?
Users often wonder if it’s possible to remove or disable the PNP monitor from Windows 10 or 7 and what consequences may follow. While you can delete or disable the PNP driver via the device manager, there’s no need to worry. Upon the next reboot, your system will automatically scan and install the latest PnP driver for the monitor.
If disabled, the Microsoft Operating system will revert to a standard VGA driver or the default driver used during the initial OS installation, ensuring your display doesn’t stop working.
Here are step-by-step fixes to address the Generic PnP Monitor problem on Windows. Apply these fixes one by one, until you find the best solution.
- Uninstall Generic PnP Monitor Driver
- Update Generic PNP Monitor Driver and Display card Driver
- Run the System File Checker
- Check for Latest Windows Updates
- Reconnect Monitor Cables
1- Uninstall Generic PnP Monitor Driver
You can start with uninstalling the PNP driver because sometimes rolling back solves the monitor issue. Once you uninstall the generic PNP monitor, your PC will automatically search and install the required driver. To uninstall follow these steps.
- Open Device Manager for that Right-click on the Windows + R keys. Type “devmgmt.msc” and press enter.
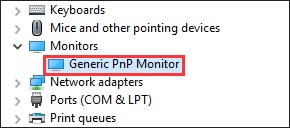
- When the Device Manager window appears, look for the Monitors option and click on it to expand.
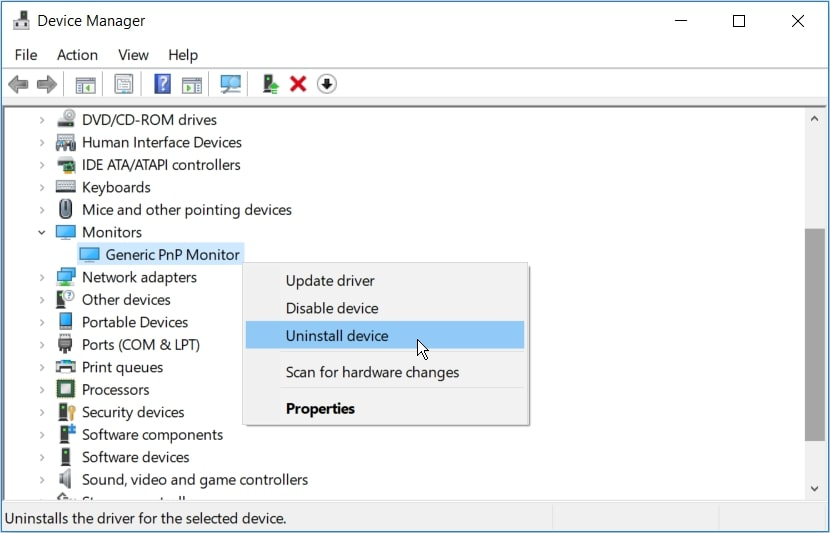
- Here you will see the Generic PnP monitor option, right-click on it and select Uninstall device option.
- Confirm the command if asked, now select Uninstall.
- Now click on Scan for hardware changes.
Here Windows will recognize and install the monitor as the real monitor and not the generic PnP monitor. If this simple fix doesn’t solve Windows 10 monitor drivers then follow the next method.
2- Update Generic PNP Monitor Driver and Display card Driver
Most of the time it’s the old driver or old graphics card driver that causes this problem. If you update these drivers there’s a good chance that Windows 10 ghost monitor problem will vanish. In this step, you need to first update the driver monitor and then the graphics card driver. Follow these steps…
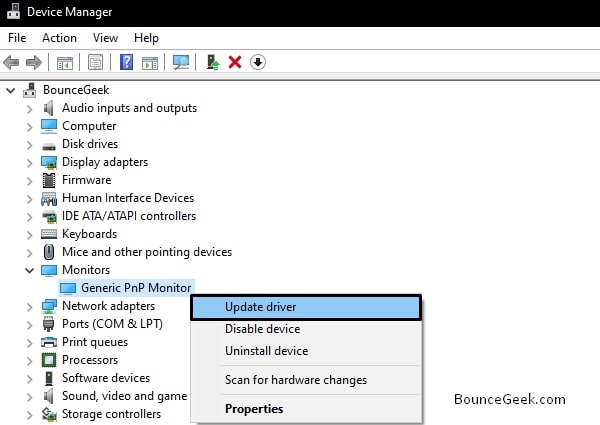
- Open Device Manager, for that Right-click on the Windows + R keys. Type “devmgmt.msc” and press enter.
- Once the Device Manager window appears, click on the Monitors option to expand it. Now right-click on Generic PnP Monitor to Update Driver.
- When you click on update driver a new box will appear. Here select Search automatically for updated driver software. Your Window will search online for that driver and update it.
- In case Windows is unable to find and update the driver then again right click on Generic PnP monitor and update it. But this time instead of selecting search automatically choose to Browse my computer for driver software.
- Now select Let me pick from a list of device drivers on my computer.
- Tick the box written as “Show compatible hardware” so that a compatible driver appears. Here select the driver and install it.
- Once again click on the Display Adapters option. Expand it and then right-click on your graphics card to Update it.
- Again select the first option, Search automatically for updated driver software to download and install the driver automatically
- Once the drivers are installed, restart your computer.
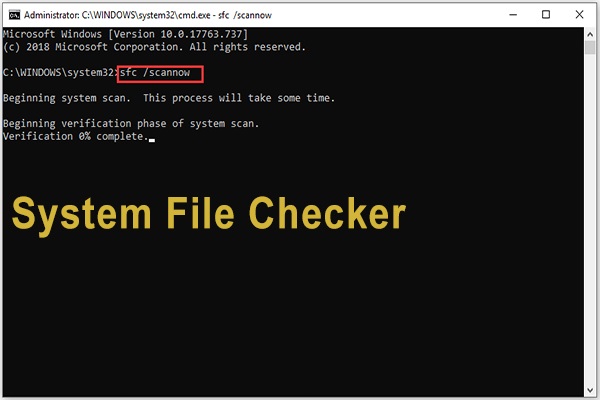
3- Run the System File Checker
If the problem still persists then you need to run the system file checker. It’s a built-in Windows 10 utility that scans and fixes corrupted drivers. Follow these steps to run SFC.

- Open Command prompt. To do that press Windows + R keys and type “cmd“.
- Alternatively, search Command Prompt from results and right-click on it to Run as administrator.
- Once a new window opens, type the following command and press Enter. sfc /scannow

- The SFC scan will start and fix the issues. Be patient during the scan because it takes time sometimes around 15 minutes.
- Once the process completes it will fix your problem with PNP devices.
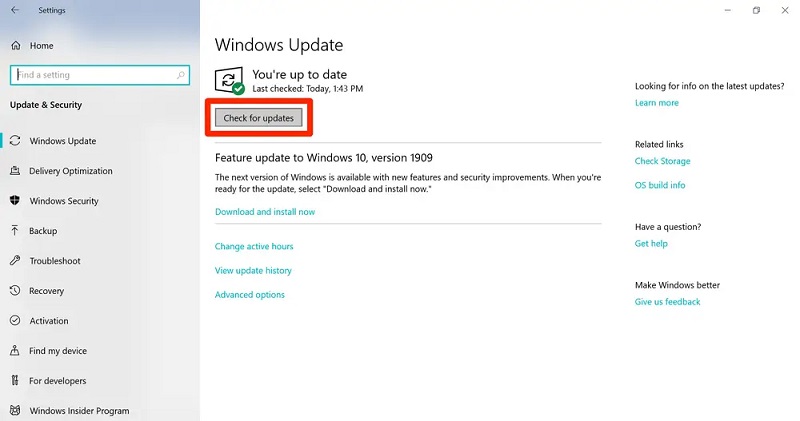
4- Check for Latest Windows Updates
As already said PNP monitor problems occur due to the old drivers. So regularly update your Windows as well because it solves bugs and errors. Besides Microsoft also releases monthly updates so there really no excuse to let your PC take risks.
Open Windows 10 settings press the Windows + I key, and then click on the Update & security option. Now check if there is any update. Download and install all Win updates.
5- Reconnect Monitor Cables
If the problem off generic PnP monitor appears on desktop PCs. Then you can try this easy tip.
- Turn off your computer and the monitor.
- Remove the power cable of the monitor and wait for at least 10 minutes.
- Unplug the video cable from the CPU and wait for 5 minutes.
- Now, plug in the video cable to the CPU and the power cable of the monitor.
- Restart the computer.
By following these troubleshooting steps, users can easily resolve LG monitor drivers, Samsung monitor drivers, Dell monitor drivers, and generic PNP monitor ASUS problems. We hope you find this article helpful in addressing and fixing generic PNP monitor errors on your Windows PC.
Read Also