Custom Resolution Utility (CRU) is a downloadable tool that allows users to define custom resolutions for both AMD/ATI and NVIDIA GPUs. It achieves this by creating EDID overrides directly in the registry, eliminating the need to deal with .inf files. It can also read extension blocks from connected monitors with AMD/ATI and NVIDIA, removing the need for workarounds on NVIDIA.
CRU automatically adds a blank extension block in the registry and .inf files, if necessary, to work around any NVIDIA driver issues. It specifically add monitor resolutions rather than scaled resolutions. While lower resolution will be scaled up if GPU scaling is enabled, higher resolution won’t be scaled down by the GPU. For higher resolution to work, the monitor must be capable of handling them.
Free Download CRU for Windows 10/7 PC
Downloading and installing Custom Resolution Utility (CRU) for Windows 11, Windows 10, Windows 7, and Windows Vista is straightforward and free. The latest version 1.5.2, offers the most up-to-date features and improvements. Click the Download Button below to Download Custom Resolution Utility Offline installer setup the Latest version 1.5.2 for your Windows PC from our fast and secure download server.
Download Information
- Developer: ToastyX
- Version: 1.5.2
- Usage: Open Source
- File Size: 532.45 KB
- Downloads: 11,287
- Operating System: Windows 11/7/8.1/10/XP/Vista
Getting Started with Custom Resolution Utility CRU
Developed by ToastyX, CRU is a lightweight and advanced tool that allows users to create and customize resolutions and refresh rates beyond the standard options provided by the operating system. It primarily focuses on adding custom resolutions, tweaking timing parameters, and fine-tuning display settings to achieve optimal performance and visual quality.
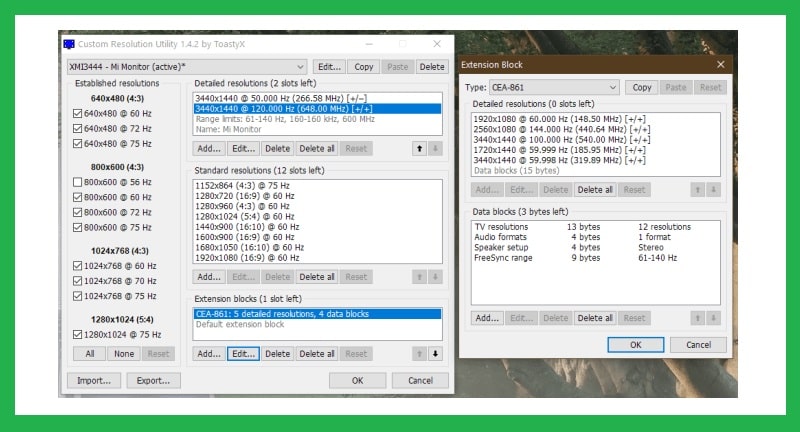
To get started with CRU, you need to run the CRU.exe file. From there, you can choose a monitor from the drop-down list. The “(active)” label indicates that the monitor is connected and recognized by the graphics driver, while an asterisk (*) denotes that changes have been made and an override has been saved in the registry. You can then edit the configuration according to your preferences.
Repeat the process for other monitors if needed. The “Copy” and “Paste” buttons allow you to copy resolutions, extension blocks, and range limits if included. However, they won’t copy the monitor’s name or serial number. Click “OK” to save the changes and run restart.exe to restart the graphics driver. If the display doesn’t return within 15 seconds, you can press F8 for recovery mode, which temporarily unloads all EDID overrides without deleting them. You can then restart the driver again to reload any changes.
To set the resolution in the Windows display settings, right-click on the desktop and navigate to the appropriate display settings. If you want to reset a display back to its default configuration, you can use the “Delete” button to remove the override from the registry and reboot. If you need to reset all displays, you can run reset-all.exe and reboot. These actions can be performed in safe mode if necessary.
Requirements for using CRU include having a Windows operating system (XP, Vista, 7, 8, 10, or 11) and an AMD/ATI or NVIDIA GPU with the appropriate driver installed. It’s important to note that the Microsoft Basic Display Adapter driver does not support EDID overrides. Some Intel GPUs and laptops with switchable graphics are supported with specific drivers.
Standard resolutions are mostly useful for CRT monitors or adding lower resolutions with LCD monitors. It’s recommended not to add the native resolution as a standard resolution. AMD/ATI only supports resolutions listed in the drop-down menu, while NVIDIA supports a maximum of 8 standard resolutions. Resolutions outside of these limitations may be ignored by the driver, so detailed resolutions should be used to add other refresh rates.
CRU offers various features, including custom resolution creation, detailed timing parameter control, EDID management, backup and restore profiles, and hotkey support for quick resolution switching. Its user interface is functional and organized, although it may appear technical for novice users. Extensive documentation and tooltips are provided to assist users in understanding the options and settings.
To install CRU, you can download the software from the official website or FileHorse and follow the installation wizard’s instructions. The software is compatible with Windows-based systems, optimized for Windows 7 or later, and requires an Intel or AMD processor, 512 MB of RAM, and 10 MB of free disk space.
CRU offers numerous benefits, such as enabling users to create custom resolutions and refresh rates beyond the default options, precise timing parameter control for optimal compatibility and stability, EDID management for unlocking additional resolution and refresh rate options, easy backup and restore of custom profiles, and hotkey support for quick resolution switching.
It’s important to exercise caution when modifying timing parameters beyond the recommended limits, as improper changes may lead to display issues. While most applications and games should work well with custom resolutions, there may be rare instances where certain programs don’t fully support non-standard resolutions. Reverting to default display settings or switching between custom profiles is possible, offering flexibility and easy restoration of previous configurations.
CRU supports multi-monitor setups, allowing custom resolutions and refresh rates for each connected display individually. However, it’s primarily designed for Windows-based systems and optimized for Windows environments. Alternatives to CRU include the NVIDIA Control Panel and NVIDIA GeForce Experience for NVIDIA graphics card users, as well as AMD Software: Adrenalin Edition for AMD Radeon graphics card users.
In conclusion, Custom Resolution Utility (CRU) is a powerful tool that provides advanced display customization options for users who desire greater control over their resolutions and refresh rates. Whether for gaming, content creation, or personal visual preferences, CRU empowers users to push the boundaries of their monitor’s capabilities. While it may require some technical understanding, the provided documentation and tooltips assist users in navigating through the various settings. With its features and the ability to unlock custom resolutions and refresh rates, CRU enhances the display experience for users.
How to Use Custom Resolution Utility (CRU)
To use the Custom Resolution Utility (CRU), follow these simple steps:
- Download Custom Resolution Utility from the above link and install it on your PC.
- Run the CRU.exe file that you downloaded.
- From the list of monitors in the CRU interface, choose the monitor for which you want to create a custom resolution.
- Look for the label “(active)” next to the monitor name, which indicates that the monitor is connected and recognized by the graphics driver.
- If you see an asterisk (*) next to the monitor name, it means that changes have been made and an override has been saved in the registry.
- Customize the configuration according to your preferences. You can modify resolutions, timing parameters, and other display settings.
- If you have multiple monitors, repeat the process for each monitor individually.
- If you want to copy resolutions, extension blocks, or range limits from one monitor to another, you can use the “Copy” and “Paste” buttons.
- Once you are satisfied with the changes, click “OK” to save them.
- To apply the changes and restart the graphics driver, run the provided restart.exe file from CRU.
- If the display doesn’t return within 15 seconds after restarting, you can press F8 for recovery mode. This temporarily unloads all EDID overrides without deleting them. After that, you can restart the driver again to reload any changes.
- To set the custom resolution in the Windows display settings, right-click on the desktop and go to the appropriate display settings. You should see the custom resolution listed as an option.
- If you want to reset a display back to its default configuration, you can use the “Delete” button in CRU to remove the override from the registry. Remember to restart the system after deleting the override.
- If you need to reset all displays to their default configurations, you can run the reset-all.exe file provided by CRU and then restart the system.
- Keep in mind that it’s important to be cautious when modifying timing parameters beyond the recommended limits, as improper changes may cause display issues.
- While most applications and games should work well with custom resolutions, there may be rare instances where certain programs don’t fully support non-standard resolutions. In such cases, you can easily revert to default display settings or switch between saved custom profiles.
Don’t forget to consult the CRU documentation or tooltips within the software for more detailed instructions and information about specific features.